That’s it. The end. That’s the one thing I always do when planning a trip.
But that’s not a very interesting blog is it? 🙂 Don’t worry.
It’s time to learn how to be an expert Google Map trip planner!
How to use Google Maps to create an itinerary for every single trip
I’m going to walk you through my process of creating a Google map for planning trips, step by step. I will show you the actual buttons to click to create a Google map and share the thought process behind how I organize my family’s travel maps as well as how I use Google maps to plan itineraries.
This might surprise you but as of July 2026, Google does not have a standalone trip planning application, so I use Google Maps as my trip planner! Using Google Maps, I’ve actually planned more trips than we’ve taken. Planning trips for myself, my family, or others is how I relax in my downtime. Hopefully, some of those trips will see the light of day, but until then, let me share the method to my madness and teach you how to use Google Maps to create an itinerary!
Step 1: Create the map.
Here are the simple steps you need to follow to create your own Google Map trip planner!
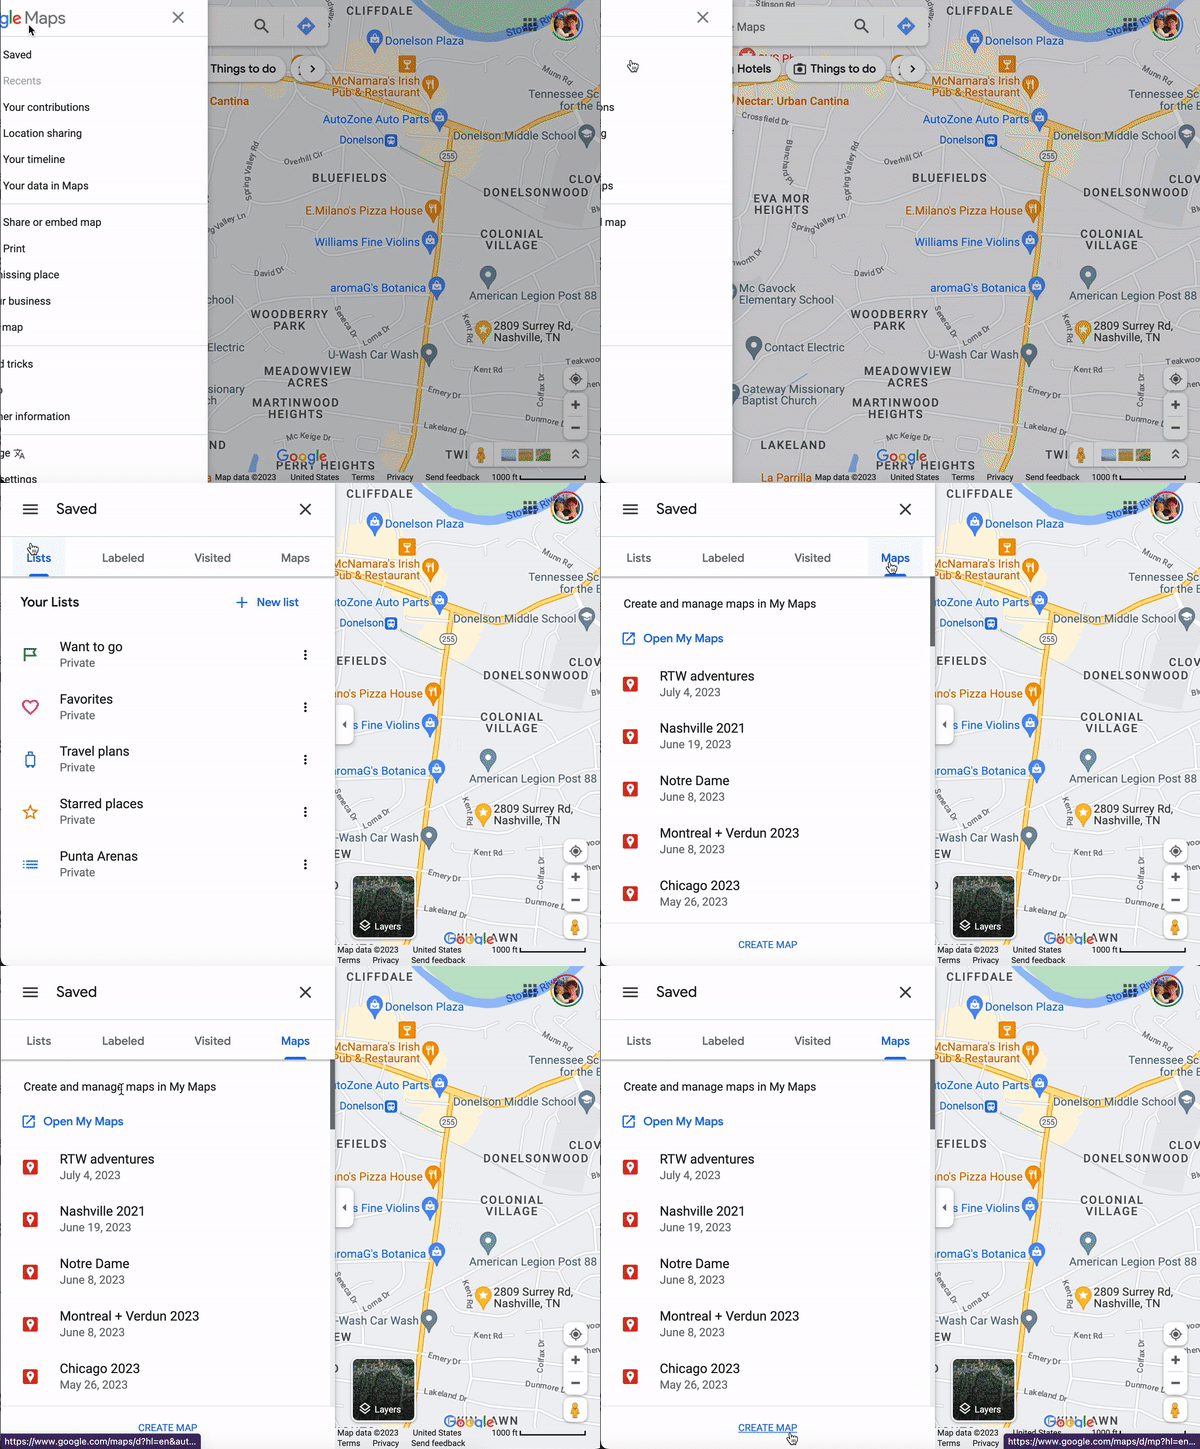
Click the hamburger menu in the top left hand corner.
Click Saved.
Click Maps, on the right side of the menu.
Click Create Map, at the bottom of the menu.
Step 2: Create the layers.
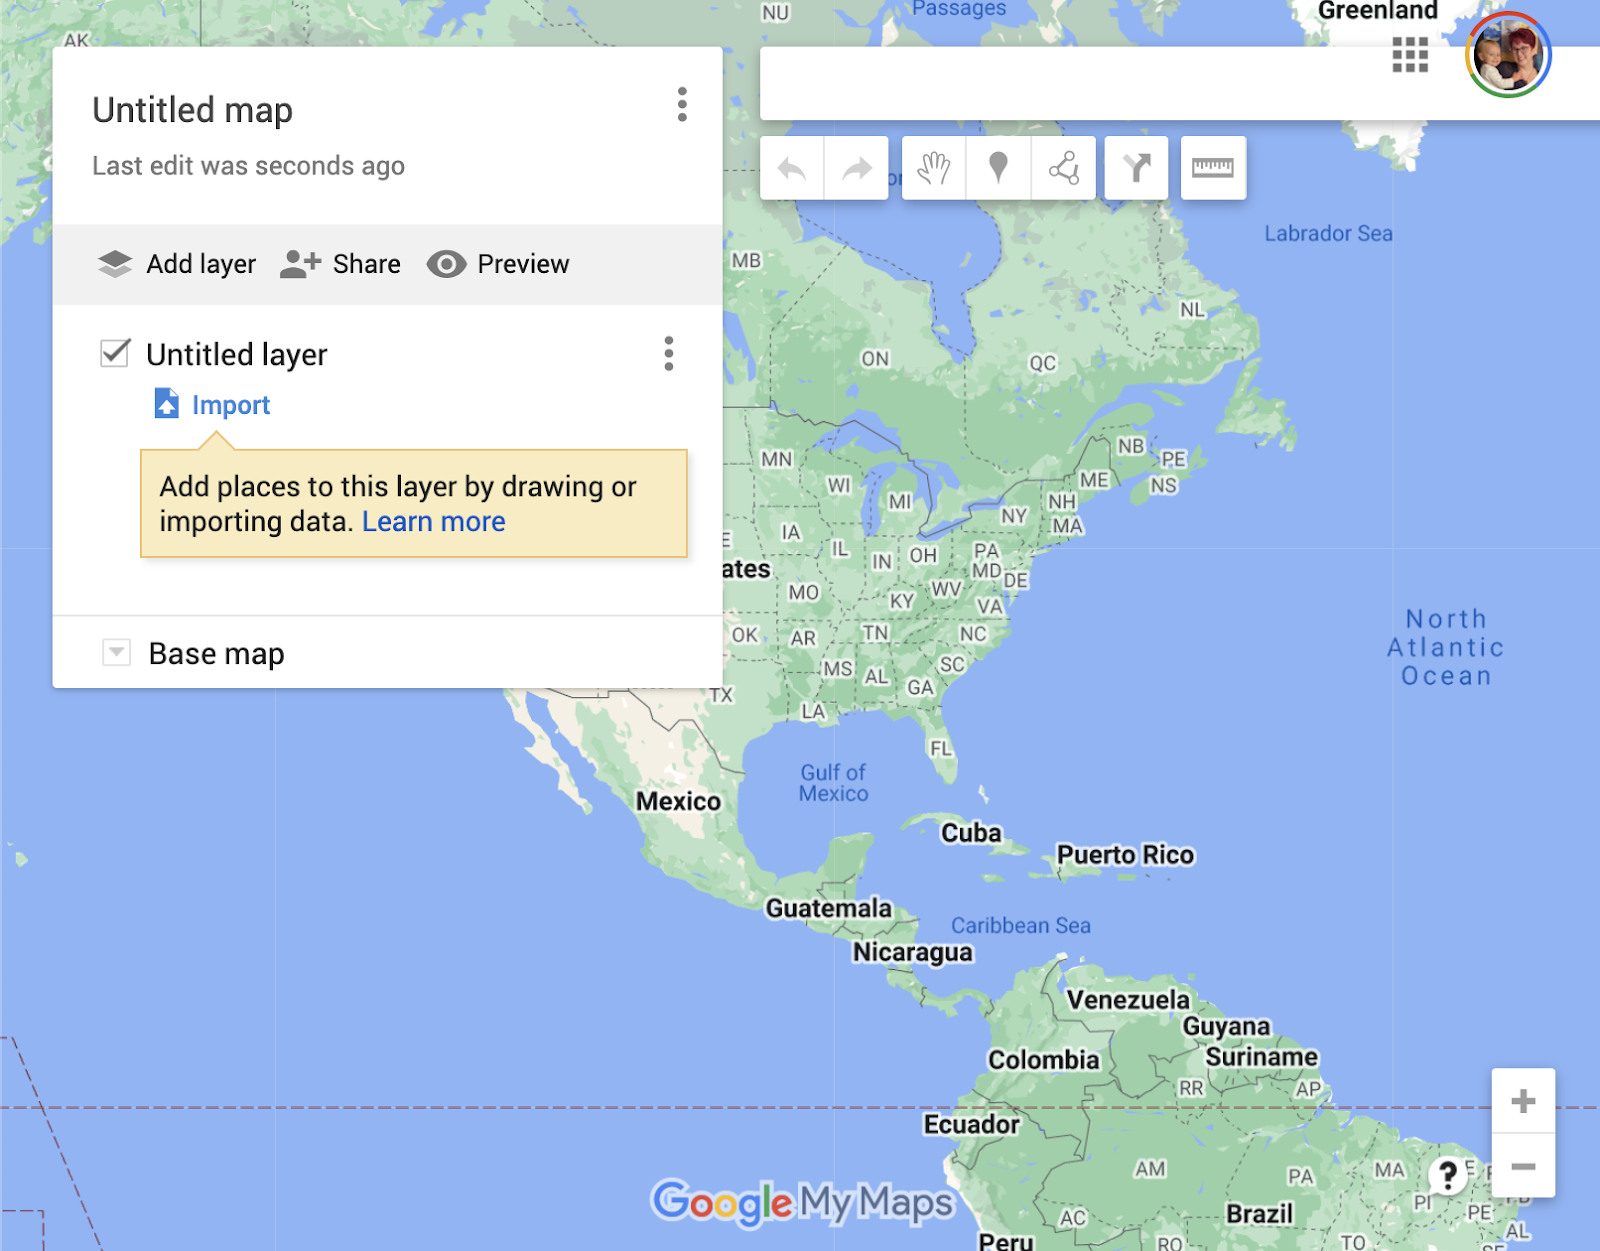
When you first create a new map following the steps above, it looks like this.
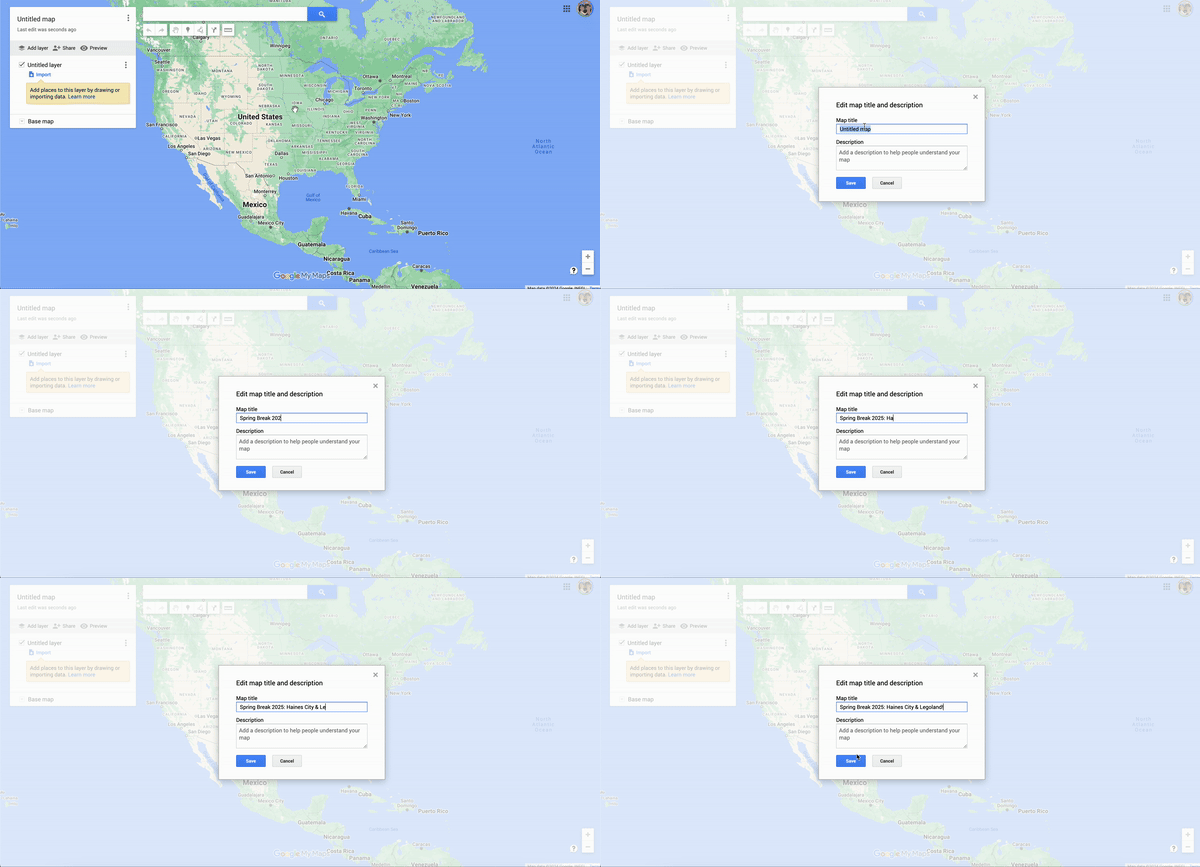
First give your map a title, so you can easily find it later. Click on the “untitled map” text to rename it. Click Save.
Next, name the untitled layer. Click the 3-dots menu and select Rename this layer. You will use at least two layers, and may choose to use more.
Think of the layers as categories that you’ll use to group activities together. You get to decide the organization system for your map. You can toggle layers on and off at any time, as well as customize the aesthetics of each layer so your map is easy to read at a glance.
Typically, I create one map per trip, and then create the following layers. Feel free to use these layers to get you started, and add others that suit your travel preferences! If you know what you want your other layers to be, add them now by clicking the Add Layer button.
Important: This layer includes where we’ll be staying; primary metro station; nearest grocery store; friend/family addresses if we’re visiting them; must-know locations such as office or conference center, if it’s a work trip; daycare, if childcare is necessary; any pre-booked commitments, such as conferences, appointments, social events, presentations, etc.
Eating and Drinking: This layer includes all of the restaurants and bars that Justin thinks sounds interesting (I add things too, but he is in charge of our travel eating).
To Do: Things that sound interesting or fun or go see or do.
Sometimes you may not know what your categories are when you start researching and planning. In the very early stages of planning a trip, you may not need any layers and you’ll just want to drop pins for any and all interesting attractions. In that case, forgo the many layers and just use one! You can drag-and-drop items from layer to layer later on.
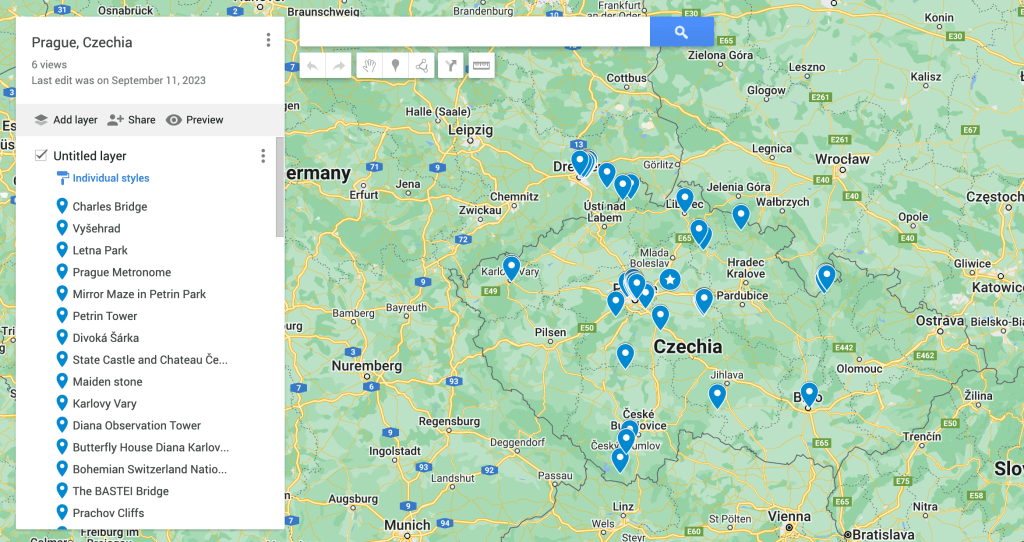
Here is a real sample map I created when I was researching Czechia as a potential summer trip destination. Going into my research, I knew *nothing* about the country so had no preconceived notions of what we would want to do. So I did not use any layers in making this map. If we had decided to proceed with the trip, then I would have continued my research and filtered everything on this map into layers.
NOTE: Similarly, when dreaming and researching about longer-form future trips, involving many potential destinations, I create a layer per destination. This way I can see all of the places in relation to one another to get a high level view of things. It helps plan routes and decide what things to leave off or make the effort to include.
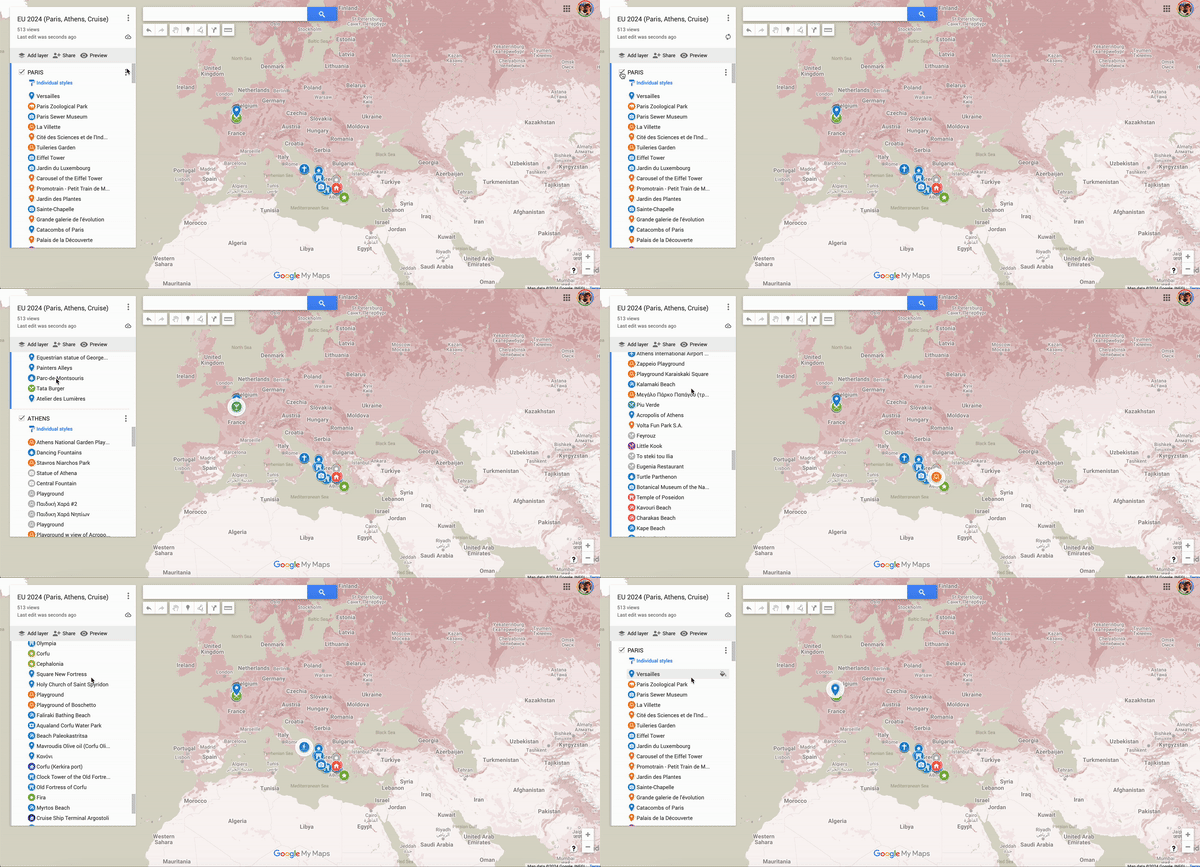
Our 2024 Europe trip took us to Paris, Athens, and several cruise ports around Greece. So I made a layer for each destination and relied on Step 5 below for organizing our points of interest.
Step 3: Do your research
As you research your destination, make a list of anything and everything that sounds interesting to you. Famous landmarks. Iconic architecture. Tours or excursions. Playgrounds or parks. Farmers markets. Hiking trails. Hole-in-the-wall donut shops. Speakeasies and craft breweries. Whatever strikes your fancy!!
When we travel as a family, I seek out as many free sites, attractions, and activities as possible. Things that we can easily see by simply walking by; areas where our kid can run around like a maniac; activities that let us better understand local culture.
When we travel without our kid, our ABC lists change. We prioritize cocktail bars and other adult-only establishments, highly-rated restaurants, longer walks or more strenuous activities. Absolutely zero playgrounds, lol. :-p
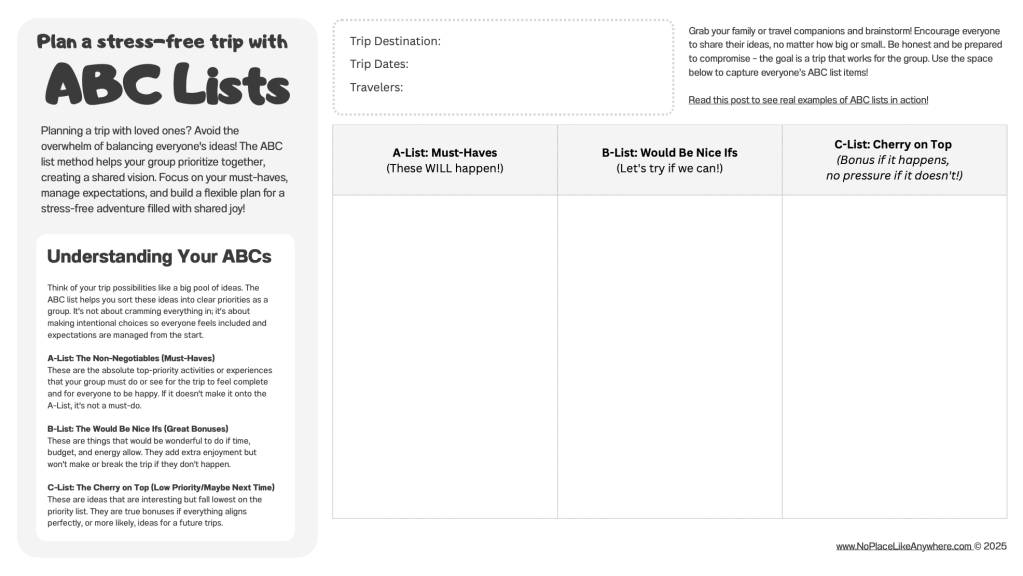
What is an ABC Travel Planning list?
When you pack your travel itinerary with a massive checklist of “must-see” attractions, you usually end up with burned-out kids and high stress levels. The ABC Planning List is a simple strategy to avoid that vacation fatigue by prioritizing your trip goals into three distinct buckets before you ever leave home. It shifts your focus from a rigid schedule to an open framework that lets your family move at its own pace.
Want a free copy of my handy ABC Planning List template? Simply subscribe to my newsletter and check your email for the download link. 🙂
Step 4: Add to your map
Now, one by one, add every single item from your research in Step 3 to your map, sorting them into the appropriate layers as you go. Think of these as map pins.
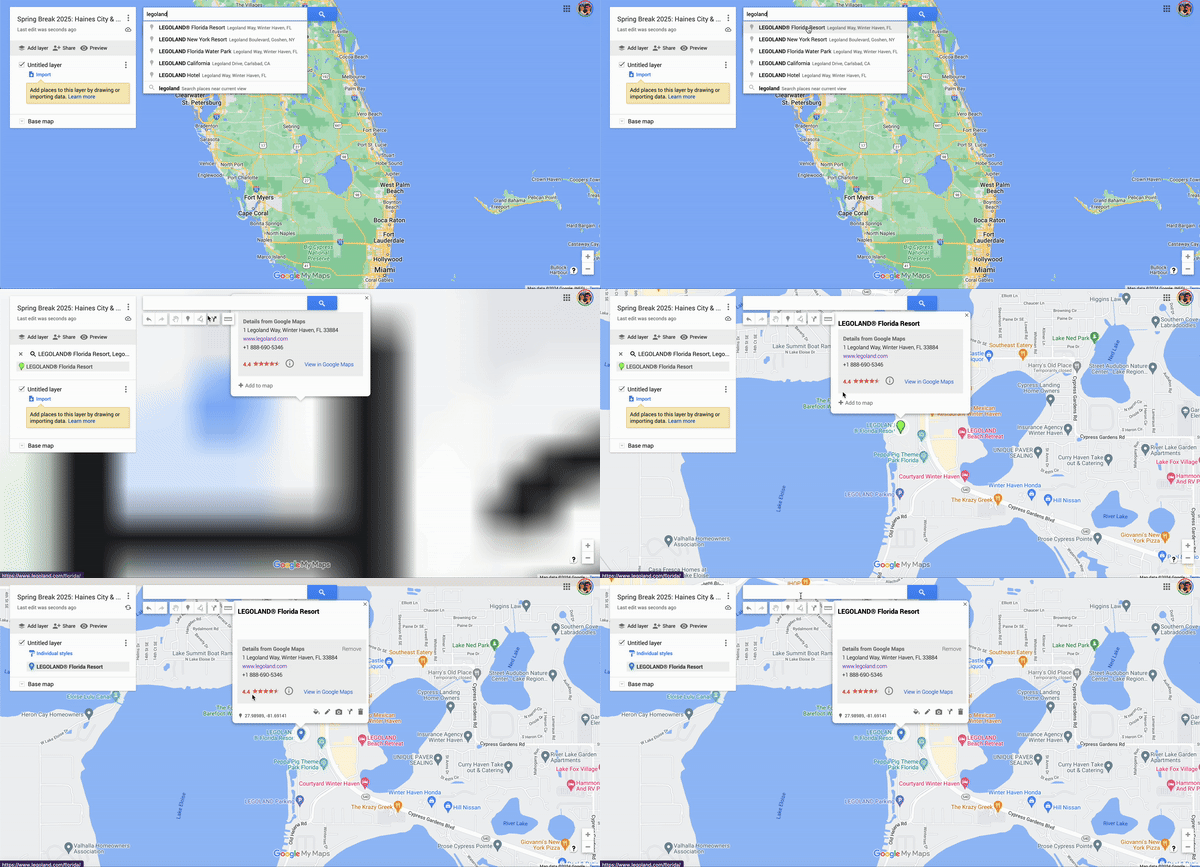
To add a map pin, type the name of the place into the search bar and click the magnifying glass to find it. It will zoom you way in, to the exact location of that place.
Click the Add to map button. You’ve now added a map pin.
Repeat.
Usually (for me at least), steps 3 and 4 happen in tandem, as one step. It doesn’t matter the order, though. Maybe you build the map slowly over a few weeks, adding things every time you read about something interesting or a coworker tells you about another brewery you just have to try! Maybe you keep notes in a notebook and add all of the places in one go. Just make sure you add everything that sounds interesting to you and your travel companions!
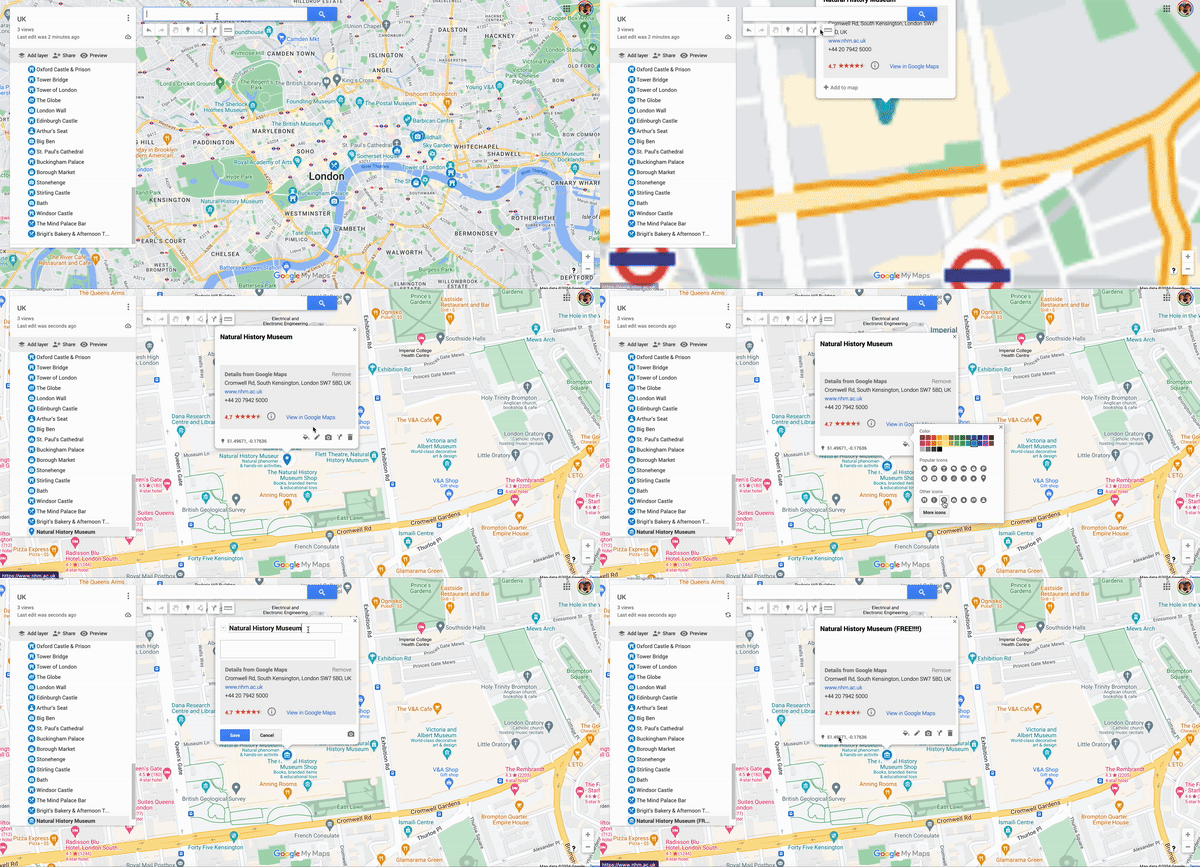
PRO TIP: Add details to the Title or Description of the map pin to remind yourself later why you added it. I like to include a link to the website and cost information!
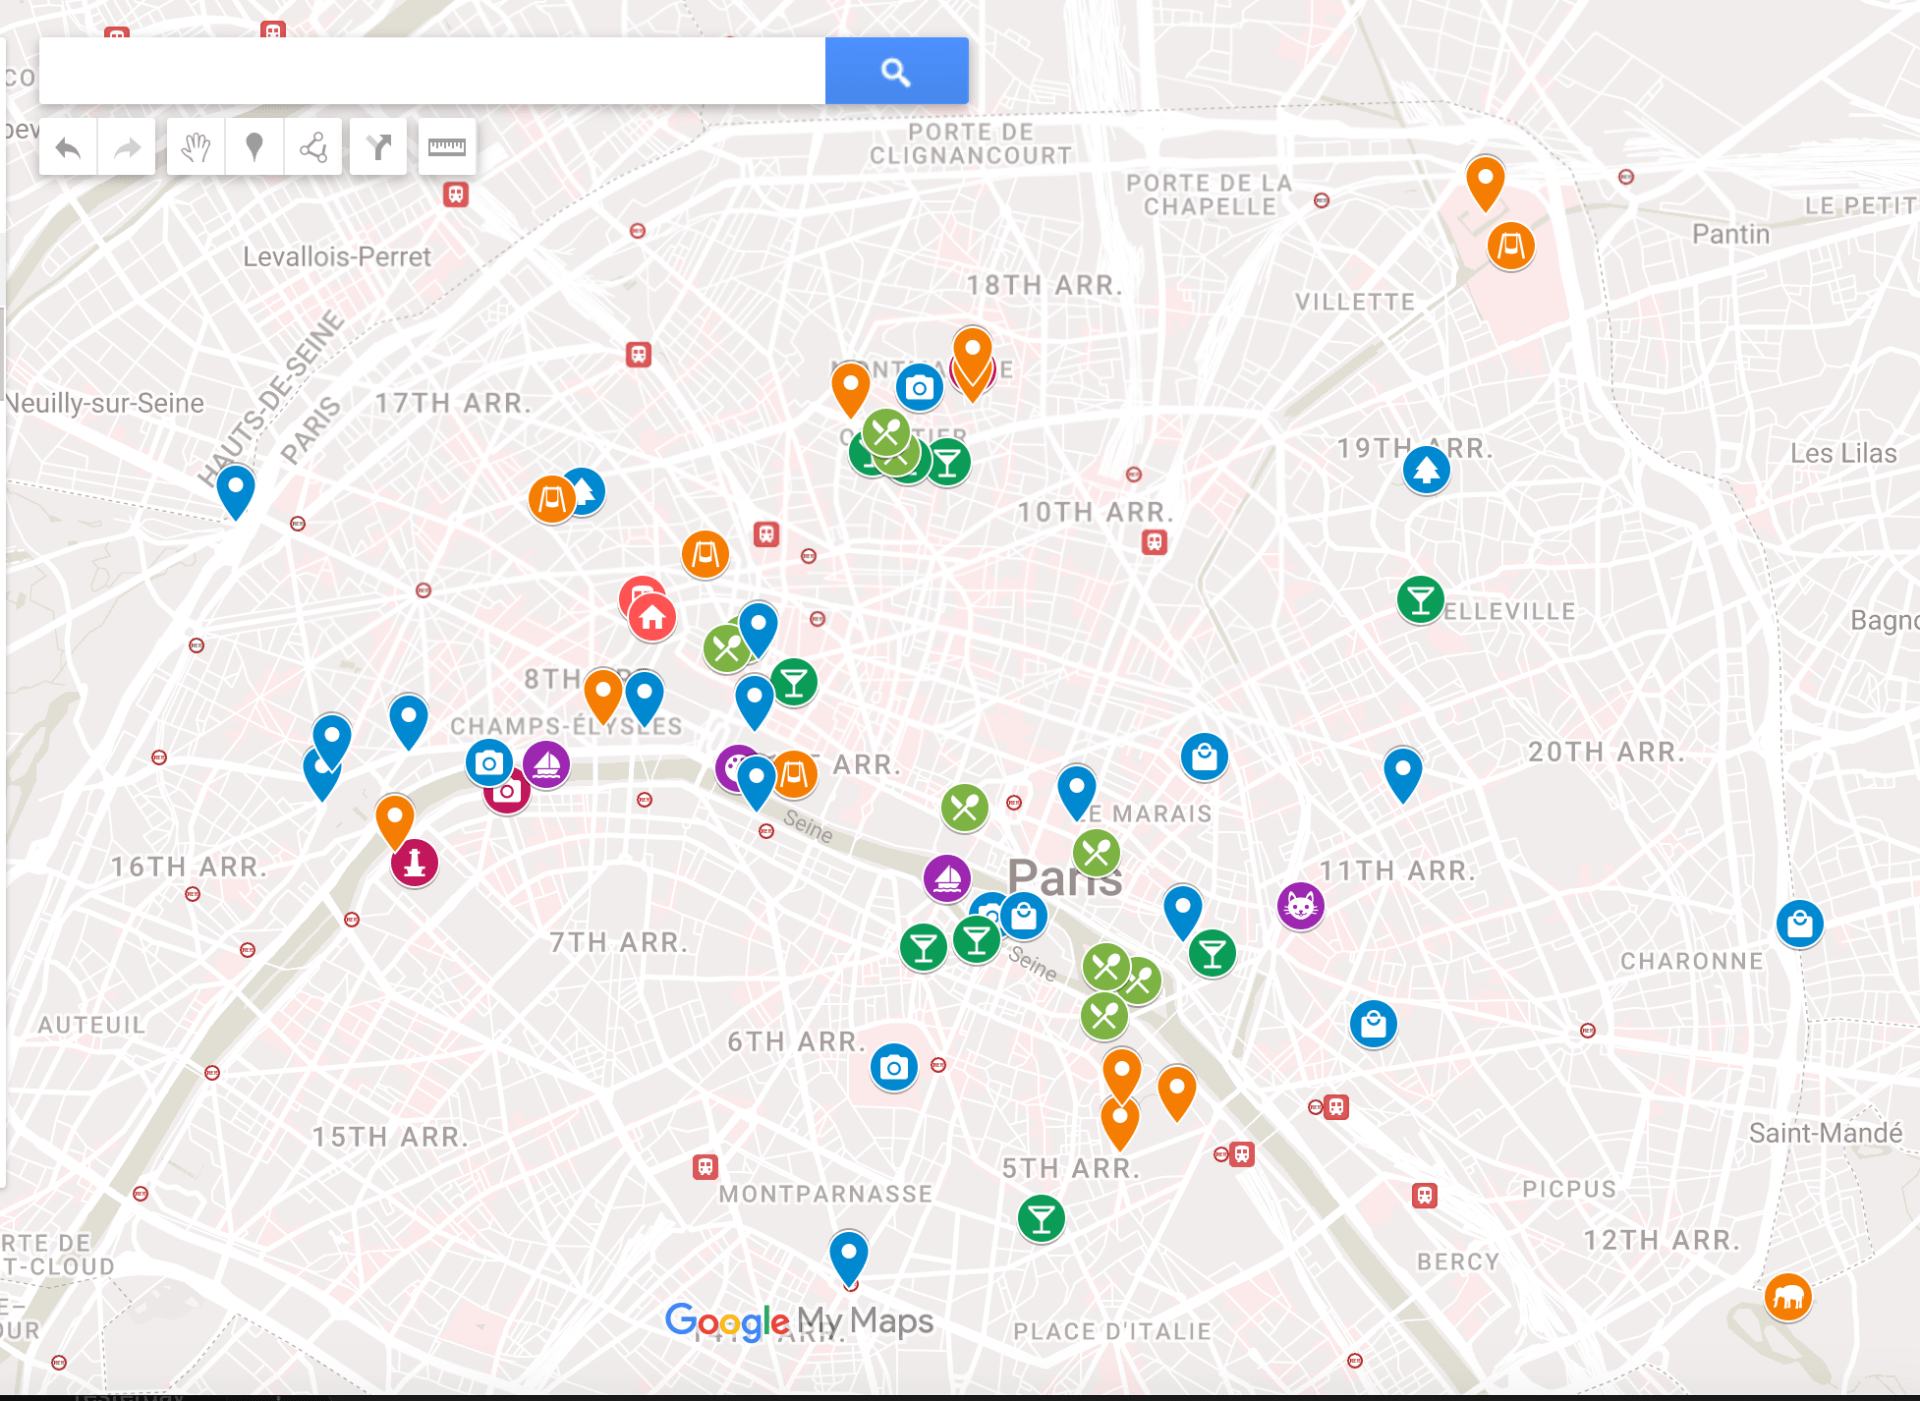
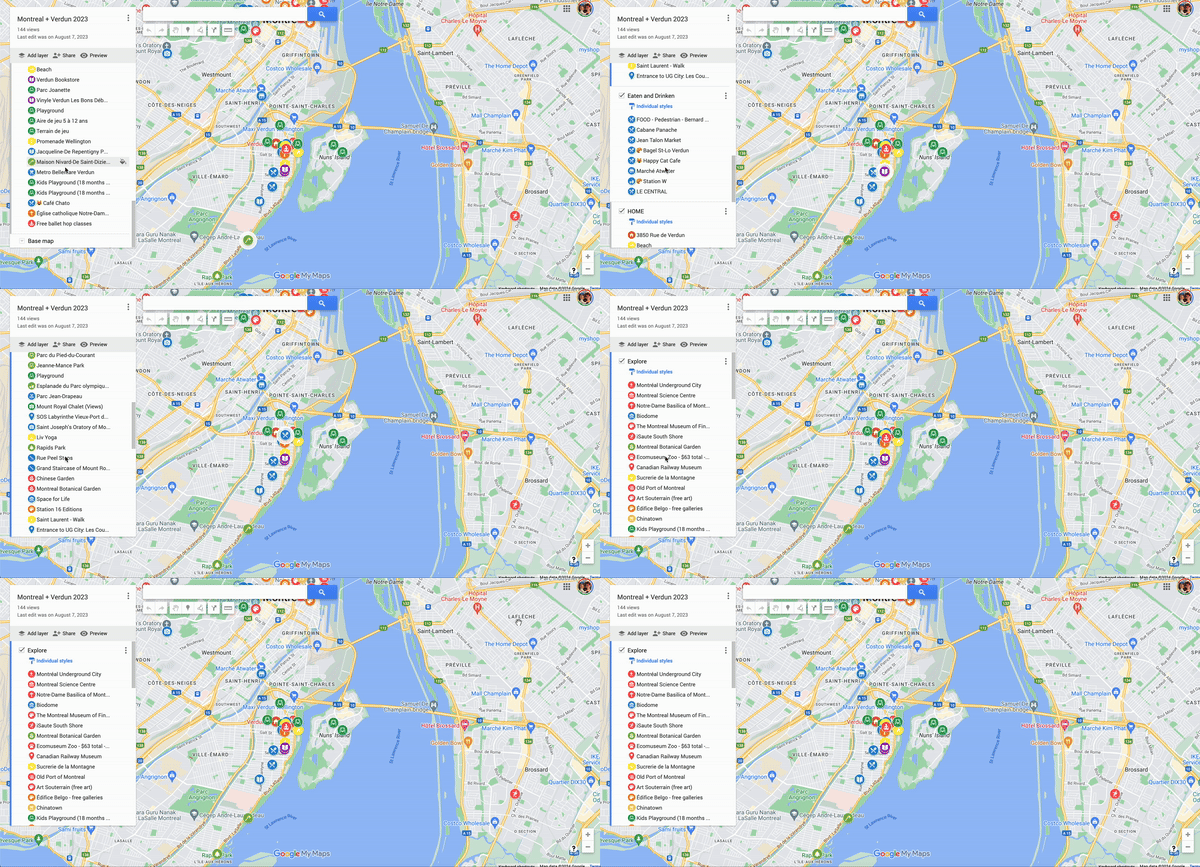
Maps should be quickly readable, at a glance, as you scroll around on your phone while walking. The whole point is quickly. And it’s hard to read a map quickly when every pin on the map looks exactly the same.
Using the available style options, create your own map legend using a combination of colors and symbols. Each layer can have a uniform style, automatically applied to any existing or newly added items. Or each item in a layer can have its own individual style, which is usually what I opt for.
I often make my “important” layer all one shade of red, but with individual icons indicating “home”, “train station”, “school”, etc. I usually use green + dining icon for restaurants (since they cost money). Sites I want to see all get the default map pin icon (usually because I’m too lazy to change so many items), however things that are free to look at or explore are usually blue, while paid activities will be another shade. If I have a LOT of one type of map pin, such as playgrounds or cenotes, I will highlight the top three that we can’t miss in red.
Don’t be dogmatic about it! This legend does not need to be consistent across all of the maps you create. As you can see by the examples below, I am constantly tweaking my process! All that matters is that YOU understand the map when YOU look at it.
Step 6: Look for areas of high-interest to build you itinerary.
Where is the highest concentration of your map pins? Start there! Pick a destination, figure out a loose walking route based on other interesting stops along the way, allowing yourself to see as many of the interesting stops as possible. Then walk out the door! That’s it! 🙂 That’s called wandering intentionally!
Explore some of the maps I’ve created for my family
Here are links to the REAL maps that I’ve created when planning trips for my family so that we can plan interesting but well-paced days of intentional wandering.
We spent 4 weeks living and working in Playa del Carmen and 1 week on PTO. Read more about our adventures (because we did this twice — in 2023 and 2024)!
We took our 5 year old to Europe on a pure PTO trip, including 5 nights in Paris, 7 nights on a cruise, and 4 nights in Athens. Read more about what we did here.
FAQs
If you have any questions, let me know so I can answer them!
Why do you use Google Maps and not [Insert Fancy App Name]?
There are many reasons that I use good ole Google Maps:
It is free to use.
It’s easy to access from any device.
Maps can easily be shared with anyone on any device.
You can download the maps for offline access.
GPS is a native functionality.
Additionally, my life is already embedded in the Google universe and I have a Pixel phone. I feel comfortable and familiar with Google products, and they let me customize things
Also, did I mention that Google Maps is free? 🙂
How many pins and layers can I add to a single custom map?
Google My Maps allows you to create up to 10 distinct layers per map project. Each layer can hold up to 2,000 separate line items!!!!!! For trip planning purposes, you won’t ever cross the total location marker limit (and if you did, please email me immediately and let me see that map LOL!) but the 10-layer maximum means you need to be strategic if you’re tackling a multi-month trip. Break your vacation down into separate map files by region or country instead of cramming everything onto a single map dashboard.
Can I share my custom itinerary map with friends without letting them edit it?
Yes, you can share your Google Maps itinerary without worrying about someone messing it up! When you finish building your custom itinerary map, look for the +Share button right in the main left-hand menu box. Click it and turn on the toggle that says “Anyone with this link can view”. Make sure you specifically set the permissions dropdown menu to “Viewer” rather than “Editor”. This will give you a link you can copy and paste into group texts, emails, or even onto your blog, letting your travel companions see your color-coded itinerary while keeping your pins locked down safely 😉
Does Google Maps auto-optimize the route order if I pin multiple stops?
Unfortunately, no, Google Maps can’t (yet?) auto-optimize any route. I wish! What a great feature that would be. Currently, Google Maps will give you multi-stop directions in whatever order you put them in. If you want the most efficient path through a neighborhood to save gas or walking time, you will need to to manually drag and drop your pinned items up or down the list until the blue navigation line stops crisscrossing back and forth across the city screen. There are other apps that can help you optimize a route, but I’m old school and do it myself 😉
How do I pull up my custom My Maps itinerary inside the standard Google Maps app?
You don’t need a separate app to view your data while you’re walking around, but this is an area where Google Maps could still improve the UX. Open the standard Google Maps mobile app on your phone, tap the Saved icon (the small bookmark flag in the bottom menu), and scroll to the far right tab labeled Maps. Tap that, choose the map you want to look at from the list, and your custom pins will instantly overlay on top of your live mobile screen. You can tap any color-coded pin to see your personalized notes, address/info, or to launch turn-by-turn driving directions right on the fly.
What if I don’t want to use Google Maps?
There are other map and trip planning apps that you can use. I don’t personally have experience with any of them so I can not recommend one over another. The list below is simply based on recommendations from other travel bloggers:
[…] integration of Google Maps into travel planning is not limited to identifying directions. It is a multifaceted tool that enriches your journey with […]
[…] and safety information is a good starting point. You can then look at the area you are visiting on Google Maps to get a sense of the distance between where you will be staying and the activities you are […]
Google Maps is incredibly useful for seeing which attractions are close together before finalizing each day. Saving places into separate lists also makes it much easier to build a practical route without constantly searching for the same locations again.
Heck yes! I seriously dont know how people traveled before Google Maps LOL (I mean, I did it, with a lot of printed out MapQuest directions and physicals maps hahaha) I am so spoiled now. Google Maps is probably my most used app, in daily life and in travel planning!



5 comments
[…] integration of Google Maps into travel planning is not limited to identifying directions. It is a multifaceted tool that enriches your journey with […]
[…] and safety information is a good starting point. You can then look at the area you are visiting on Google Maps to get a sense of the distance between where you will be staying and the activities you are […]
[…] If you want a concrete example of organizing day-by-day plans in a single view, search for Google Maps step-by-step itinerary guides. They show how to create layers for each day and layer-by-layer routes. A helpful guide is here: https://noplacelikeanywhere.com/how-can-i-help/planning/a-step-by-step-guide-to-using-google-maps-fo…; […]
Google Maps is incredibly useful for seeing which attractions are close together before finalizing each day. Saving places into separate lists also makes it much easier to build a practical route without constantly searching for the same locations again.
Heck yes! I seriously dont know how people traveled before Google Maps LOL (I mean, I did it, with a lot of printed out MapQuest directions and physicals maps hahaha) I am so spoiled now. Google Maps is probably my most used app, in daily life and in travel planning!